EMACS Version 2.11
This library enhances the
built-in editor of the HP49G with features known from famous GNU Emacs editor.
You will find things like dynamic or table guided completion, incremental search,
regular expressions, folding, macro recording, programming language support
(RPL and ML) and extensibility (write you own editor commands).
The library command RPLED is
a wrapper around the built-in editor which supports integrated development on the
HP49G in a way similar to the Jazz editor ED on the HP48, with automatic
decompilation on entry and recompilation on exit.
Since Emacs is technically an
Editor *extension* and not an independent application, it does not have its own
fixed key table. Emacs/RPLED works with an application menu and leaves the
keyboard to the user to make suitable assignments for various Emacs and other
commands.
COPYRIGHT and DISCLAIMER
This library is copyright
© 2000, 2001, 2002, 2003, 2004, 2005 Carsten Dominik <dominik@science.uva.nl> and Peter Geelhoed <p.f.geelhoed@wbmt.tudelft.nl>
and may be distributed
freely, provided that this copyright notice remains unchanged and is
distributed with the program. We are not responsible for whatever this program
does to your calculator. Back up your RAM.
CONTENTS
- Version 2.10
- Version 2.0
- Version 1.11
- Version 1.10
- RPLED
- RPLCPL
- Confg.EMACS
- CO..
- USER COMMANDS
- VARIABLE NAMES
- EXTABLE NAMES
- VARIABLE NAMES
- ROMPOINTERS/USERRPL
COMMANDS
- TABLE GUIDED
COMPLETION
- DCO..
- MSG..
- SetMk
- GoMk
- GoToLbl
- MREC
- ARG?
- Find
- ReEx
- REPLACE
- Meta
- HALT
- →STK
- Help
- FNT
- Config
- Indnt
- UNCOMMENT
- COMMENT
- {↔}
- ~FOLD
- UNFOLD
- OBSEL
- ( → )
- EBR
- →EBR
- EDOB
- LOCATE
- ASM
- Import
- Export
- :: ;
- LAMS
- BEGIN
- TRAP
- CODE
- IT→{}
- CUT→
- TAB→
- NL&IND
- All control
characters:
- Motion
- Deletion
- Selection, cut and
paste
- Case changes
- Style changes
- Transposition
- Formatting
- Miscellaneous
RECENT CHANGES
Version 2.11a
· Version 2.11a
fixes a bug with the long-hold-time, present only in 2.11 on the 49g+.
· Adaptation to the
new ROM version 2.0. Mostly fixes
to display routines which need to work differently now.
· This version requires Rom 2.0 or
larger.
· Emacs should now
also work on the hp48gII.
Version 2.10
- Changes in SDIAG for the hp49g+ (the HP49G version is
unchanged)
- New documents about reserved variables and flags
integrated and crosslinked. Thanks to Federico Marziali.
- For all UserRPL commands, SDIAG now documents access
to this command through menus and direct keys. Thanks to Joe Horn
for contributing this information.
- New Mechanism to document library commands: A
file with the name LDOCnnn (where nnn is a library number) can be stored
in the directory 3:"SDIAG/L/" and will be used automatically by
SDIAG to find documentation about commands in library nnn. These
library documents can also be viewed through the LDOC command, and from
the EBR entry browser, using the LDoc menu option. For details on
the format of the LDOC file, see SDIAG.txt in the Emacs distribution.
- Text documents about various issues are all
accessible through the EBR entry browser. Use the 0 (zero) key to
jump to the section with the text documents.
- There is a new special purpose viewer for viewing
text documents and library documentation. In this viewer, left and
right arrow can be used to page through the document. Menu options
jump to the sections of the document (section headings are linses
starting with an asterix).
- RPLCPL has been improved as a CAT replacement.
Library commands are no longer shown in (hard-to-read) italics.
Instead they are labeled with their library id. Thanks to Wolfgang
Rautenberg for this idea.
INSTALLATION
Since the arrival of the
hp49g+ and hp48gII calculators, there are two different versions of Emacs and
its accompanying libraries. Therefore, the installation procedure will
depend on the calculator your are using.
|
Library |
HP49G |
hp48gII |
hp49g+ |
|
Main Emacs library |
Use EMACS.49G from the Emacs
distribution. |
Use EMACS.49GP from the
Emacs distribution. |
Use EMACS.49GP from the
Emacs distribution. |
|
Stack diagram display In order to display stack diagrams, you need a version of the SDIAG
library. |
On calculators without an
SD card, all stack diagrams are part of a (very large) library. Use SDIAG.49G from the Emacs
distribution and install it. |
On the hp49g+, the SDIAG library is small. It accesses data from
a special directory on the SD card. Use the library SDIAG.49GP and install it normally.
Then use an SD card reader (no, you cannot do this via the USB connection)
and copy the entire directory SDIAG unchanged into the root
directory on the SD-card |
|
|
If you’d like to program in SystemRPL and/or ML, you need a version of
the EXTABLE library. You can get one from HP and from www.hpcalc.org. You can
also use the extended version extable2.lib included in the emacs
distribution. |
Use extable.lib from HP, or extable2.lib from the Emacs distribution.
If attaching the library fails, try installing it through the Filer with
Move. Extable2.lib is very
large, it may be necessary to empty most of your RAM in order to be able to
install it. |
||
|
For decompiling code, you need the Nosy library, available from www.hpcalc.org |
Get Nosy 2.1 and install
it. |
||
|
If you’d like Emacs to be able to edit BZ compressed files and to
recompress those files after editing, you need the OT49 library, available
from www.hpcalc.org |
Get OT49 and install it. |
Get OT49+ and install it. |
|
TUTORIAL
This tutorial assumes that
you have installed Emacs.lib and SDIAG.lib. It focuses on the use of Emacs when
programming UserRPL programs. People who have started with SystemRPL or ML
should have no difficulty to understand the more reference-like manual below.
- Press APPS, select Emacs and press the AsnEmacs key
to make a few useful key assignments. In the tutorial we will use
RightShift & DOWNARROW = RPLED RightShift & RIGHTARROW = RPLCPL
LeftShift & UPARROW = SDIAG where the & means to
hold down the shift key while pressing the arrow key. Make sure you are in
USER mode, or the key bindings will have no effect. 2. Start writing a
UserRPL program by pressing RightShift <<>>. The built-in
Editor starts up. Press RightShift <<>> a few more times to
get more nested program delimiters (we will need them later).
- Switch to the Emacs application menu by pressing
RightShift & DOWNARROW. Press the Help key and then OK to see a chart
of all Emacs commands. Press any key to go back to the command line.
- Press ALPHA ALPHA EX to enter the letters
"EX". Press RightShift & RIGHTARROW to start completion.
Instead of using this key combination, you can also exit ALPHA mode by
pressing ALPHA again, and then press the CO.. menu key.
- You get a list of commands starting with EX. Move
down to the EXPAND command and press ENTER. The command is completed into
the command line.
- Press LeftShift & UPARROW to see the stack
diagram of this command.
- Press the CAS.H menu key. The built-in help for this
command (exists only for CAS commands) is displayed. Press EXIT twice to
go back to the command line.
- Press NXT to get the second menu page. Move the
cursor on one of the << program delimiters and press the {↔} menu
key several times. The cursor will jump back and forth between matching
delimiters, even if the delimiters are nested.
- Type the words EXP and EXLR after the EXPAND word.
Move the cursor to the beginning of the command line. Press PREV to go
back to the first menu page. Press the Find
menu key in order to start the incremental search environment. Press E,
then X, and see how the editor finds the "EX" at the beginning
of EXPAND. Type RIGHTARROW to move to the next match, the "EX"
in "EXP". Type L to add another letter to the find string, and
the first match of this combination is "EXL" in the word
"EXLR". Press ENTER to exit the search environment.
- Press LeftShift and then the |> menu key to start
recording a key macro. Press 1 2 3 4 ON, and your macro to insert the
number 1234 is recorded. Press the |> menu key several times to execute
the macro. Hold down the |> key and see how the macro automatically
repeats. We hope this got you started. There are a lot more commands
available in Emacs, read the manual to find out and use the Refcard and
the HELP menu key to aid your memory.
TERMINOLOGY
In the command descriptions
below, the following terms may need further explanation:
|
Library Menu |
The menu which you get with <<1790 TMENU>>. In contrast to
many other libraries, this menu is hardly ever used, except when making a
program involving Emacs commands. |
|
Application |
The menu which comes up when you launch RPLED. This is a 3 page Menu
where all menu keys (unshifted, left- and right shifted) provide access to
most Emacs commands. |
|
Default mode |
The normal operating mode of the calculator, with the stack visible on
the scree. |
|
In the editor |
The HP49G editor is the editing environment that is
entered by typing numbers and text into the command line, by editing an
object using DOWNARROW or by using a command like INPUT or InputLine. |
|
MASD files |
When developing SysRPL or ML code, you are working with MASD source
files. These files contain a "@" as the last character. Emacs sees
this character and behaves differently. For example, RPLCPL completes UserRPL
commands in the command line, but SysRPL/ML entry names in MASD source files. |
|
Selection: |
The text between the BEGIN and the END marker. The HP49G displays this
text inverted. Several commands in Emacs act on the current selection, but
only if the cursor is inside or next to the selection. This is a precaution
since some commands like searching leave small selections in the buffer which
you may not be aware of when you execute a command. If not at a selection,
these commands act either on the whole file or on the current line. |
|
Long: |
Several commands behave slightly different when you press the key
invoking them slightly LONGER than normal, similar to KEYMAN's IfL
assignments. This models the behavior of "prefix arguments" in the
real "GNU Emacs". In this library, LONG usually means "more
detailed" or "deeper". |
|
LEFTSHIFT: |
Indicates the menu key function when pressed with leftshift. Shifted
menu keys execute commands which are related to the unshifted keys. |
|
RIGHTSHIFT: |
Indicates the menu key function when pressed with rightshift. |
|
UP LEFT RIGHT DOWN: |
The arrow keys. |
KEY ASSIGNMENTS
In general you should not use
the EMACS library menu to access the commands. Instead, assign RPLED to a key
as shown below and use the application menu installed by this command. We also recommend
assigning RPLCPL to keys both with and without alpha mode, since you will be
using this command a lot. You may want to assign other commands as well if you
find you need them all the time.
An easy way to make several
useful key assignments is to
-
use the APPS key
-
select the "Emacs" entry
-
press the "AsnEmacs" menu key
-
press OK.
This will produce the
following key assignments (the "&" means that you need to hold
the Shift key):
|
|
|
Key |
Assignment |
Also in ALPHA mode? |
|
RightShift |
& |
DOWN |
RPLED |
No |
|
RightShift |
& |
RIGHT |
RPLCPL |
Yes |
|
LeftShift |
& |
RIGHT |
DYNCPL |
Yes |
|
RightShift |
& |
UP |
SDIAG |
Yes |
|
LeftShift |
& |
UP (with
longpress) |
EDOB |
Yes |
|
RightShift |
& |
. |
NL&IND |
Yes |
|
RightShift |
& |
| |
Meta |
Yes |
If you don't like any of
these assignments, you will have to do the ones you want yourself. Let's say
you'd like
-
RPLED on RightShift&DOWN
-
RPLCPL on RightShift&RIGHT
-
DYNCPL on LeftShift&RIGHT
With Wolfgang Rautenberg's KEYMAN,
the following keys will make these assignments. Note that we want to keep
Kermit SERVER program on RightShift&RIGHT outside the editor. In the
following, '→TO', 'IfE', and 'A?D' are commands in KEYMAN. Press these command
keys only short, not long.
\<< RPLED \>> ENTER →TO A?D LeftShift&DOWN
\<< RPLCPL
\>> \<< SERVER\>> ENTER IfE →TO DUP A?D Rightshift&RIGHT A?D ALPHA RightShift&RIGHT
\<< DYNCPL \\> ENTER →TO DUP A?D LeftShift&RIGHT A?D ALPHA LeftShift&RIGHT
The last two assignments are
duplicated for normal and ALPHA mode, so that you don't need to leave ALPHA
mode for completion.
COMMANDS IN DEFAULT MODE
Only few EMACS commands are
useful in default mode, i.e. outside the editor. One way to access these commands
is through the APPS key on the HP49G.
COMMANDS IN THE EMACS APPLICATION MENU
The EMACS application menu
has 3 pages. Additional functions are available with shifted menu keys. Some of
the commands appear in the application menu with a label differing from the
command name. For example, CO.. is the label for RPLCPL etc. Therefore the
descriptions of the commands look like this:
|
DCO.. <<DYNCPL>> (LS CO..) |
Completion based on … |
DCO.. is how the command
looks in the menu chart. (LS CO..) is how to access this command (press
LeftShift CO..). << DYNCPL >> is how to program this command, for
example if you want to assign it to a key.
Page 1: General editing commands
CO..
|
What is completed on the command line (UserRPL)? USER COMMANDS
If you press the RPLCPL key briefly, user commands from the catalog
are completed. These include commands in attached libraries. If the cursor is
after white space, all UserRPL commands are shown. VARIABLE NAMES
What is completed in MASD source files? EXTABLE NAMES
VARIABLE NAMES
When the word before the current is ID or INCLOB or INCLUDE, variable
names in the current directory are completed. Press the key LONG, and the
whole path is searched for matches. ROMPOINTERS/USERRPL COMMANDS
If you complete a string starting with "x", Emacs checks for
Extable names and for catalog entries (UserRPL commands) and merges the two
lists. This can be slow if there are many completions, so it is recommended
to specify at least one character in additions to the "x" in order
to keep the list reasonably small. Note that there are some entries in the
catalog (like FOR) that are not valid in MASD source files. Example: type "xRPLC". It is expanded to xRPLCPL. TABLE GUIDED COMPLETION
If you complete a string starting with a dot, completion is based on a
table or program in the global variable 'cpltab'. If this file contains a
string, it should be a list of completion items separated by new lines (i.e.
lines). For example, if the cursor is after ".abc", Emacs will
offer all lines in cpltab starting with "abc". For even more
general applications, 'cpltab' may also be a program that takes the string to
be completed from the stack and returns a list of possible completions. |
||||||||||||||||||||||||||||
DCO..
(LS CO..) << DYNCPL >> |
Completion based on the words present in the file being edited. It is
called "dynamic" because it adapts to contents of the current file. The interface is different from RPLCPL. If you
complete on "fl", DYNCPL searches backwards through the current
file to find other words that start with “fl” as well and immediately inserts
the first match. It highlights the part of the word you had typed. If you
don't like that particular match, press again THE SAME KEY that invoked
DYNCPL, and it will search for further matches. "ON" aborts,
"ENTER" accepts the current match, and all other keys accept the
match and execute the key. Most of the time, you will press SPC or NEWLINE
after completion. If you press DCO.. long, dynamic completion will ignore any leading
`=', `*', `!' in both the current word and any possible matches. This is nice
for completing labels in ML and local variables in SysRPL. Examples for LONG-Touch application:
|
||||||||||||||||||||||||||||
MSG..
(RS CO..) |
Message number retrieval. This command helps to find
the access bint of built-in messages in the calculator. It prompts for a
search string and matches it against all messages on the calculator. The
matches are offered in a choose box. Select a message and the corresponding
message number will be inserted into the editor, ready for JstGETTHEMSG etc.
Using #nnn JstGETTHEMSG instead of a string generally saves a lot of bytes. Pressing this key long will access the list stored in $MESSAGE
instead, so this can be used to get message numbers while writing a new library.
The number inserted into the editor will not contain the library number,
assuming that the library handles messages with a special rompointer which
adds the library number before calling JstGETTHEMSG or DO#EXIT. |
||||||||||||||||||||||||||||
SetMk
(LS GoMk) |
Prompts for a mark number (1-3) and saves the position and 3 lines of
context in the hidden directory (EMC.mrk). Therefore, these marks survive
exiting the editor and can be used when you re-edit the file. Note that they
take up permanent storage space, so you should use not too may different
marks or purge the variable occasionally (see Confg.EMACS). |
||||||||||||||||||||||||||||
GoMk
(Mark) |
Prompts for a mark number (1-3) and jumps to the position where
this mark was set. Searches for the saved context (3 lines) and goes to
the match closest to the old position. When the context cannot be found
(because it was changed), jumps to the old character position. |
||||||||||||||||||||||||||||
GoToLbl
(RS GoMk) |
Offers CHOOSE box with the labels in the edited file and jumps to the
selected label. Unlike the built-in GOTOLABEL command, this ignores lines
with space between the "*" and the text. So it will find
"*MAIN" as a label, but ignore "* This is a comment".
This allows to put comments into SysRPL programs without having them show up
as labels. With a LONG key press, the labels are offered for insertion, not
for goto. |
||||||||||||||||||||||||||||
|
<< MPLAY >> |
Execute the previously recorded key macro, see MREC below. Example:
How to put a "*" in the first column of several lines. Put the
cursor at the beginning of the first line. Then
press:
The first line now carries
the star, the cursor is in the second line. Now press |> a few times to execute
the macro. Hold the key down to automatically repeat. Want to do it for
exactly 33 lines? Press RightShift |> 33 ENTER |> |
||||||||||||||||||||||||||||
MREC
(LS |>) |
Start recording a macro key sequence. This command records several key
presses into a macro which you then can execute as one command. Pressing
"ON" terminates the recording. The keyboard macro is stored in a
variable in the hidden directory and therefore preserved between editing
sessions. In order to free up the space taken by a macro, purge the hidden
variables (see Config) or record an empty macro with MREC ON/CANCL. |
||||||||||||||||||||||||||||
ARG?
(RS |>) |
Repetition factor for the following command. Enter a number N and
press ENTER. The next key you press will be executed N times. For example
'ARG? 5 ENTER A' will insert "AAAAA" into the editor. |
||||||||||||||||||||||||||||
Find
<< IFIND >> |
Find searches the command-line for a string and is generally much
faster to use then the built-in SEARCH. The search starts immediately when
the first character is keyed in and continues as you add characters to the
find string ("incremental search"). If you press the Find key LONG,
the previous search is repeated. Interface When you press the Find key in the menu you see in the header area
"Find: " and you are immediately in alpha mode. Start keying in the
characters you want to search for. Find will go to the first match after the
current position. If you are not satisfied with this position, key in more
characters or press the RIGHT-arrow to find subsequent matches until you find
the right place. Press ENTER to return to the editor at that position or
press ON/CANCEL to return to the original cursor position. Find has its own
menu, but most commands are also available with other keys, in particular the
arrow keys. The arrow keys have their functionality independent of ALPHA
mode, so there is no need to toggle alpha mode for using these commands. Menu and Key Commands EDIT (or DOWN-arrow) takes you into an INPUT screen to provide more
editing options for the find string. REPL (or LEFT-arrow) prompts for a string to replace matches of the
current find$ with. If you press ENTER, Emacs will find matches of the find
string and offer a menu with the following options.
RCL (or UP-arrow) recalls the word currently under the cursor, from cursor
to end of word, into the find$. If pressed again gets next word too. NEXT (or RIGHT-arrow) finds next match of the find string or beeps if not
found. If the search string is empty, this command retrieves the most recent
item in the find string history (see below) and uses it as find string.
Pressing Find long repeats the previous search without starting the
incremental search environment. HIST (or LeftShift UP-arrow) CHOOSE box with 5 most recent find strings.
The history is stored in the Hidden directory and survives exiting the
editor. Each time you terminate a search with ENTER, the current find string
is added to the history. CaSe / CaSe# toggles case sensitivity. Whenever a lower case
letter a-z is keyed in, case sensitivity is automatically set. Backspace (the key, not in the menu) delete last character in
find string, search again from original position. RightShift UP search from beginning of file. ENTER exit Find, return to editor at current position. ON/CANCEL exit Find, return to original cursor position. |
||||||||||||||||||||||||||||
ReEx
(LS Find) |
Regular expression search. The environment provided for regular
expression search and replacement is exactly the same as for the incremental
search (see above). Only difference: typing a new search character starts a
new editor for editing the regular expression. So the regexp search is not
"incremental". The regular expressions in Emacs don't backtrack,
quantifiers are greedy and possessive. For detailed documentation see the Regexp.txt
file in the distribution. Regular expression
metacharacters
|
||||||||||||||||||||||||||||
REPLACE
(RS Find) |
Global Find&Replace, without query. Asks for a search string and a
replacement string and replaces one with the other in the entire file. If you
have to do many replacements, this is faster then the replace option in the
Find application. |
||||||||||||||||||||||||||||
Meta
<< Meta >> |
Starts the Emacs Meta mode to execute a command in the Emacs macro
language. The macro language gives access to most simple motion and editing
commands without having to switch to the TOOL menu, as well as to more
complex commands like transposition and paragraph filling. For a list of
available commands, see near the end of this document. In Meta mode, ALPHA
shifted keys and ARROW keys work normally. All other keys execute the macro
command associated with the character on the key. Therefore, 'ALPHA A' will
insert 'A', while pressing 'LeftShift F1' will execute the macro command
associated with character 'a', i.e. move to the beginning of the line.
RightShift 2 (that's where the question mark is in alpha mode) shows the
available commands. Pressing Meta enters Meta mode in which you can execute a series of
commands. While this mode is active, the IO indicator of the calc is on. Exit
the command mode with ON or ENTER. For example, `Meta 5 2 2 2 S ENTER' will
duplicate the current line, move the duplicate past the next 3 lines and
center it. If you press Meta slightly longer, command mode will be active
only for a single key press. For example, `Meta(long) Q' will format the
selection as a paragraph and immediately return to the normal editing mode. |
||||||||||||||||||||||||||||
HALT
(LS Meta) |
Suspend the editor and start a session with the stack. Recursive
RPLED's are allowed. Press CONT to get back into the editor. |
||||||||||||||||||||||||||||
→STK
(RS Meta) |
Push a copy of the editor contents onto the stack. When the selection is
active and the cursor inside or next to the selection, the selection is
copied to the stack. Otherwise the
entire Editor content. |
||||||||||||||||||||||||||||
Help
|
Display help for Emacs. You can choose between a menu chart and
command descriptions. In the chart there are there are 3 rows of labels for
each menu page. The rows mean, from top to bottom: unshifted, leftshifted,
rightshifted. The inverted labels indicate commands which have a LONG touch
option, they will act slightly differently when the key is pressed long. If you
choose the command description, you get a file with shows reference
descriptions of all Emacs commands. |
||||||||||||||||||||||||||||
FNT
(LS Help) |
Toggle minifont display. Be careful since the display update is not
always reliable. Works best if your
current font is FONT6. |
||||||||||||||||||||||||||||
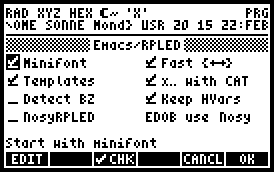
Config
(RS Help) |
Offers a CHOOSE box for Emacs configuration. The different items in
the box mean: Options
Run the Confg.EMACS InputForm to customize Emacs/RPLED settings. See
above for details. Purge Hidden Vars
Purge the hidden variables EMC.mrk, EMC.fh, EMC.kbm which contain the
marks, the find string history and the keyboard macro, respectively. These
things take up permanent space. You can also set an option to remove them
each time RPLED exits, see above). Edit 'emacs'
Edit the contents of the 'emacs' variable with additions to the Emacs
menu (see below "ADDING YOUR OWN COMMANDS"). Edit 'diagram'
Edit the content of the 'diagram' variable which is used to set
stack diagrams for commands not covered by the SDIAG library. Edit 'cpltab'
Edit the content of the 'cpltab' variable which is used for
completion of user-specified items (see above). Asn Keys
Install a set of standard Emacs key assignments. See above under
AsnEmacs for a list of assignments. |
Page 2: SysRPL and ML programming
Indnt
|
Indent current line according to context. This indents code correctly
even if you have several commands in each line. If the cursor is at or inside
a selection, the entire selection will be re-indented. Otherwise only the
current line. EXAMPLE: The following fragment was indented automatically with
this function:
To re-indent a part of a program, put the cursor on the opening
"::", use the command "[..]" (see below) to select the
current secondary and press "|→" to indent. The Emacs library also contains the command NL&IND which inserts a
newline char and indents the new line. This is a very useful assignment for
the newline key. |
||||||||||||||||||||||||
UNCOMMENT
(LS Indent) |
Remove the SysRPL comment starter "* " from the beginning of
the current line or all lines in the current selection. When pressed LONG, the ML comment starter "%
" is used. |
||||||||||||||||||||||||
COMMENT
(RS Indent) |
Add the SysRPL comment starter "* " to the beginning of the current
line or all lines in the current selection. When
pressed LONG, the ML comment starter "% " is used. |
||||||||||||||||||||||||
{↔}
<< DFIND >> |
Jump to matching delimiter. Jumps between
The normal version of this command ignores MATRIX, SYMBOL and UNIT
since they would make :: |
||||||||||||||||||||||||
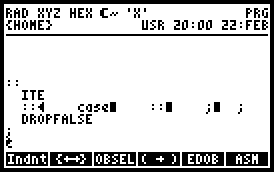
~FOLD
(LS {↔}) |
Toggle folding of the current secondary or list into a single
line. The cursor must be on the opening delimiter. Folding works by
converting the NEWLINE characters into char number 29. Folding can be very
useful to gain overview over stacked embedded secondaries or lists. Example: Lets say you have the following program in the editor. ITE If the horizontal line marks the end of the screen,
the ELSE clause of the ITE statement is not visible. In order to get
overview over the entire structure, put the cursor on the first :: after the ITE and press ~FOLD. The IF clause collapses into a single line. Press ~FOLD again to get the normal structure back.
CAVEAT: -
The
char \1D must not be used in the file. |
||||||||||||||||||||||||
UNFOLD
(RS {↔}) |
Unfold any folded parts in the entire file. |
||||||||||||||||||||||||
OBSEL
<< OBSEL >> |
Select syntactic unit. When the cursor is on a delimiter, select the region
between the delimiter and its matching delimiter. Otherwise select the object
at point. For example, if the cursor is anywhere in HXS 4 1234, the entire
"HXS 4 1234" is selected.
With LeftShift: Select the current line. With RightShift: Select the
entire text in the editor. |
||||||||||||||||||||||||
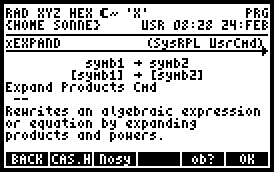
( → )
<< SDIAG
>> |
Show the stack diagram or library provided help for the command/entry
under the cursor. This command works also outside the editor with a string,
rompointer or a list containing a rompointer on the stack. First, the SDIAG
library is searched for a stack diagram of the command. If none is found, we
check if the command is a rompointer and has help provided by the
corresponding library. This works for all built-in CAS commands in the
calculator, for all Emacs commands and for any other libraries which provide
help for their commands through the library message handler. '( → )'
works in many different locations. For example, to get help about the EXPAND
command, press the key with ·
"EXPAND" on the stack ·
EXPAND
on the stack (e.g. {EXPAND} HEAD) ·
{EXPAND} on the stack ·
in
the command line with cursor at EXPAND ·
when
editing a MASD source file with cursor near xEXPAND The display will look like this
and you can use the following menu keys:
|
||||||||||||||||||||||||
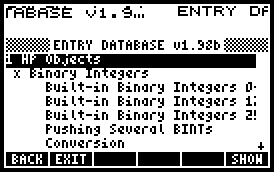
EBR
(LS ( → ) ) |
Browse the entry list in a functionality-sorted way. This opens a browser
which contains the table of contents of the Entry database. Selecting a
section shows a list of entries in that section. For each of these entries
you can look at the stack diagram and description. For fast navigation in the
browser use the number keys 1-9,0 to jump to a chapter, and then use the X
key to jump to the subsections of that chapter.
If you press SHOW, a new browser opens with all entries in that
category. From that list you can
use the following commands:
|
||||||||||||||||||||||||
→EBR
(RS ( → ) ) |
Like EBR, but jumps immediately to the section containing the entry at
the cursor position. For example, if the cursor is near CMD_PLUS, it jumps
to the subsection on Inserting Text in the Editor Commands section in
the Input and Output chapter. Press F6 (SHOW) to see a list of other
commands inserting text into the command line editor. |
||||||||||||||||||||||||
EDOB
|
Extract and decompile object under cursor. The decompiled object can
be viewed in another instance of RPLED. Exiting with ON or ENTER returns to
the first instance of RPLED. Special cases:
|
||||||||||||||||||||||||
LOCATE
(RS EDOB) |
LOCATE is intended for large ML projects which distribute the code
over several files. LOCATE visits include files and finds the definition of
constants, variables and functions.
Emacs will try to locate the corresponding definition with a brute-force
search of all string files on the current search path. If the definition is
found, the file will be visited in a secondary editor session. After exiting,
you will be back in the initial editor session. For a detailed description of
Locate, see Denis' document Locate.txt in the Emacs distribution. |
||||||||||||||||||||||||
ASM
|
Call ASM on the content of the editor without leaving the editor. When
there are compilation errors, jumps to the first error. If there is an active
selection in the editor, only the selected part is compiled - otherwise the full file. Compilation is done in MASD SysRPL mode,
but if the key is pressed long, ML mode will be used. |
||||||||||||||||||||||||
Import
(LS ASM) |
Decompile the object on stack level 1 and insert the resulting string
into the editor. |
||||||||||||||||||||||||
Export
(RS ASM) |
ASM the object at the cursor and push the compiled object onto the
stack. If there is an error during compilation, shows the error and where it
happened. |
Page 3: Templates
If you don't find these
templates useful, the template menu page can be removed from the Emacs menu
with the Emacs configuration form (to save some memory and startup time). See
above under "Config". We will not explain the templates here in detail
- just play with the buttons to see what exactly they insert. All templates
take care of correct indentation and position the cursor at the first insert
location. Internally, all templates are implemented as Emacs macros (see
below). If you are trying to remember what the left- and right shifted actions
do, think of left as "less" and right as "more".
:: ;
|
Insert ":: ;" templates in one or several lines.
|
||||||
LAMS
|
Insert a template for binding named or unnamed local variables (LAMS)
|
||||||
BEGIN
|
Loop templates.
|
||||||
TRAP
|
Error handling templates:
|
||||||
CODE
|
Insert basic ML templates
|
||||||
IT→{}
|
MASD SKIP templates for INT (ifnot-then) and INTE (ifnot-then-else),
and for a simple loop.
|
Miscellaneous commands
The following commands are
not in the Emacs application menu, but can be assigned to keys.
CUT→
|
Delete the rest of the current line and append it to the current
content of the Clipboard. If the cursor is already at the end of the line,
deletes the newline character. So when you are at the beginning of the line,
pressing CUT→ twice deletes the whole line. When pressed LONG, the Clipboard
is first cleared. Example: Press the key 4 times (long short short short) and
two lines including final new lines will be on the clipboard, ready to be
pasted back. |
TAB→
|
Tabulator command. Inserts enough spaces to reach the next TAB
position. Tab positions are
0,4,8,12,... |
NL&IND
|
Insert a LINEFEED character and indent the new line according to
context, by using the Emacs INDENT command. This is a very useful assignment
for the newline key. |
ADDING YOUR OWN COMMANDS
To add your own editor
commands to the Emacs menu, store a list in the global variable `emacs'. The
list has basically the same format as a CUSTOM-menu, but the interpretation of objects
in the list is slightly different.
|
Insert string at cursor position. The string can contain control
sequences which execute editor commands (macro language, see below). |
|
|
A list is interpreted as {LABEL ACTION}, as in normal CST menus. If
ACTION is a list, the list elements define actions for unshifted and shifted
key presses, as usual. If any of these actions is a list, it defines a
submenu. |
|
|
program |
Execute program. TakeOver is not required. When invoked, process
content of variable as Emacs menu entry. If the content of the variable is a
list, it defines a submenu and the label for the menu entry will have the DIR
bar. |
|
Any other object type is illegal and will produce "???" as
label to indicate the error. |
Example:
{
"GOVLNG"
@
insert this string
{ ":: ;" ":: ;|b|b"} @ insert :: ;"
template, position cursor
{ "EOF" "|>" }
@ Go to end of file
MyProgs
@
Menu entry, to execute content of global
@ var MyProgs. When the var contains
@ a list, execution produces a submenu.
}
MACRO PROCESSOR
A string in the command list
in the `emacs' variable may contain control sequences which are interpreted as
a macro language. A control sequences consists of the vertical bar `|' and one
character. Here are a couple of examples which would make useful editing
commands:
|
a) |
Cut the rest of the current line from the editor and
save it in the clipboard for pasting. 1. Mark as BEGIN. 2. Goto end of line. 3. Mark as END 4. CUT Here is the macro string: "|[|e|]|w"
|
|
b) |
Duplicate the current line:
In the macro language, this is written as:
"|L|W|y" |
|
c) |
Insert a "*" at the beginning of the current line and move to
the next. We already discussed this problem above as an example for the
keyboard macro recorder. If you need this command more often, it will be
useful to include it into list `emacs' list.
Here is the macro string: "*|b|n" |
With these 3 example macros,
the `emacs' list looks like this:
{
{ "CUT→"
"|[|e|]|w" }
{ "DUPL" "|L|W|y" }
{ "*" "*|b|n" }
}
You can also execute an Emacs
macro from a program if you want to bind such a command to a key. The following
example creates a program to CUT the current line and binds it to
RightShift&CUT (→TO and A?D from KEYMAN):
\<<
"|[|e|]|w" EMacro \\> →TO A?D
RightShift&CUT
All
control characters:
Here follows a list of all
macro control characters. The different characters have been chosen
systematically. Most characters are taken from the standard functionality of
GNU Emacs. Capital letters means "more". For example, in GNU Emacs
Control-f moves forward a character. Therefore, we use "f" for moving
by one character and "F" for moving by a word. Similarly, Meta-w is
COPY in GNU Emacs. So we use "w" for COPY and "W" for CUT.
Other mnemonics are given in the table.
Note that all these commands
can also be executed interactively, using the Meta mode (see above).
Motion
|
F |
forward char, like (LEFT) |
|
B |
backward char, like (RIGHT) |
|
N |
next line, like (DOWN) |
|
P |
previous line (UP) |
|
A |
beginning of line (RS-LEFT) |
|
E |
end of line (RS-RIGHT) |
|
< |
beginning of file |
|
> |
end of file |
|
F |
skip to next word-start |
|
B |
skip to previous word-start |
|
I |
Tab→ |
Deletion
|
H |
backspace (BS) |
|
D |
delete (DEL) |
|
H |
delete to previous word-start |
|
D |
delete to next word-start |
|
K |
delete to beginning of line |
|
K |
delete to end of line |
|
X |
delete the current line, including the newline |
Selection, cut and paste
|
[ |
set beginning of selection (BEGIN) |
|
] |
set end of selection (END) |
|
- |
same as [ |
|
+ |
same as ] |
|
C |
clear selection |
|
L |
select line (excluding final newline, cursor at beginning) |
|
L |
select line (including final newline, cursor at beginning) |
|
0 |
select word at point |
|
1 |
select object at point (OBSEL) |
|
G |
jump to beginning of selection. If already there, jump to end. |
|
J |
jump between delimiters
(DFIND) |
|
W |
copy selection into clipboard (COPY) |
|
W |
delete selection into clipboard (CUT) |
|
Z |
copy selection and append it to the clipboard |
|
Z |
delete selection and append it to the clipboard |
|
Y |
yank clipboard into editor (PASTE) |
|
Y |
edit the clipboard contents |
|
P |
evaluate the current selection and replace it with the result. If there
is no selection, the region from the beginning of the line to the current
cursor position is used instead. |
Case changes
|
U |
make current word UPCASE and move on to next word. |
|
U |
make current word downcase and move on to next word. |
|
C |
capitalize current word and move on to next word. |
Style changes
|
Mnemonics: second letter of
style name |
||||||
|
|
Transposition
|
Mnemonics: like the arrows on a keypad |
Formatting
|
S |
center current line in screen width. |
|
Q |
fill the current line or selection to the width of the screen. The
beginning of the selection sets the left border of the filled text, which is
useful to format hanging paragraphs like the one you are reading now. |
|
7 |
Remove one space from the start of each line in the selection, or the
current line. |
|
9 |
Add one space to the start of each line in the selection, or the
current line. |
Miscellaneous
|
m |
Insert newline |
|
| |
Insert `|'. So it insert a bar, use "||". |
|
3 |
Lists the BINT at point in
HEX and decimal formats, along with the message associated with the bint. |
|
@ |
show cursor position as → and pause for 3 seconds. For debugging. Not
available in Meta. |
|
* |
move cursor to this position after macro finishes. E.g. ":: |*
;". Does not work as a Meta command. |
|
$ |
"Standard flag settings": -68(auto indent) set, -69(infinite
line) set Useful to write templates independent of flag settings. System
Flags are always saved and restored around an Emacs macro. |
NOTES
1.
Emacs writes four variables into the
hidden directory: EMC.cfg The configuration EMC.fh The find string history, s
list with <= 5 elements. EMC.kbm The keyboard macro EMC.mrk The marks, a list
with <=9 elements. You can remove all except EMC.cfg with the Config command
(RS Help). You can also configure Emacs to remove them each time you leave
RPLED. To remove also EMC.cfg (e.g. if you want to uninstall Emacs), use the
APPS key, select the Emacs entry and press CLEAN.
2.
Emacs was entirely developed on an HP49G.
This may be seen as an indication for the power of the HP49G and its built-in
development tools.
3.
Font toggling inside the editor does not
update the display correctly if the height of the font changes. But you can
without problems toggle between FONT6 and the minifont.
4.
Emacs is not aware of text styles and
different fonts in a single file. Some of its commands may fail if you have
different styles or fonts in the buffer.
5.
For the time being, CQIF? can still be
used together with Emacs, but I am considering dropping the support for it
since most people seem to use Nosy.
ACKNOWLEDGMENTS
Many people have contributed
directly and indirectly to this Library.
- Denis Martinez wrote LOCATE and donated it to Emacs.
He also wrote code for the lookup of SysRPL entry points and created the
initial version of the SDIAG database.
- Much of the stack diagrams in that database are based
on Robert Perry's Online Reference for the HP48, Eduardo Kalinowski's book
"Programming in System RPL" and on Mika Heiskanen's
"entries.srt". Thomas Rast, Wolfgang Rautenberg, Alberto Zamora
Oyace (Beto), Piotr Kowalewski and in particular Jean-Yves Avenard also
contributed stack diagrams. Thanks to all of them.
- Thomas Rast contributed his extended version of the
extable library. He has also been beta-testing Emacs, and has made many
useful suggestions.
- Wolfgang Rautenberg shared important information
about keys and menus on the HP49, encouraged and tested much of EMACS and
has made suggestions to improve the documentation and to save bytes. A few
small pieces of code in Emacs have been "stolen" from his KEYMAN
and OT49 libraries. His routine for detecting long key presses (written together
with Jonathan Busby) makes it possible to provide flexibility in many
Emacs commands.
- Federico Marziali contributed his documents about
flags and reserved variable names. He also converted the documents into
a special format appropriate for reading on the calculator.
- Joe Horn has contributed his document about keys and
menus to access User commands.
- Heiko Arnemann took upon himselft the task to
transform the Emacs documentation into this nice HTML file.
- Jurjen Bos created hooks for Emacs in his Nosy
library.
- Pierre Tardy created hooks for Emacs in his CQIF
library. He also contributed a fast ML list merger which is used by
RPLCPL.
- Werner Huysegoms answered many of the questions I
(CD) had during the development of this program.
- Tim Wessman has functioned as a beta-tester of some
versions.
- Cyrille de Brebisson wrote the HP49G catalog, MASD,
and the EXTABLE library, which are all used by Emacs. He also provided
information about the HP49 CHOOSE engine.
- Sébastien Carlier and Christoph Gießelink wrote
EMU48. Without this program, the creation of the SDIAG library would have
been much harder.
- Jean-Yves Avenard wrote the HP49 editor and made
extra information about it available to us. He also created additional
#EXTPRG messages so that Emacs can hook itself into the built-in editor
menu.
- Mika Heiskanen wrote Jazz and ED. Even though I (CD)
never had an HP48 with Jazz, the documentation of Jazz has provided ideas
for EMACS.
- Richard M. Stallman and many others wrote GNU Emacs,
from which many ideas are borrowed for Emacs. In particular the
flexibility of the RPLCPL command would probably not have been implemented
if GNU Emacs had not made me so addicted to completion.
- Eric Rechlin maintains hpcalc.org - an indispensable
source of information and code.
May 2005. Carsten and Pivo.