Helicopter rotor / Fixed axle adjustable fan
A helicopter rotor rotates on a fixed axle,
and yet manages to make
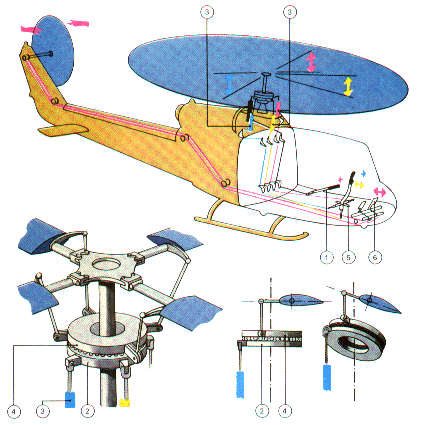
the helicopter tilt and turn. It does this by a mechanism in which the pitch of
the blades can be adjusted arbitrarily. In other words, the 'lift' vector
has three degrees of freedom: its magnitude(one DOF) and its
orientation (two DOF),
and these are adjusted by the orientation of a plate (4) on which rods
run that adjust the pitch of the blades; and by the height of the plate,
which determines the overal pitch. Here is a figure [from 'Dit is je Wereld',
Het Spectrum Publishers].
These different properties of the plate are adjusted by the controls
1 and 5.
The challenge is to turn this into LEGO. This requires a fully adjustable
plate (2, 4), on a rotating axle.
I used the rotor head that LEGO puts on its
helicopters, which work improperly in that they actually tilt the rotor
axle itself (see 8412). The key observation that makes the model work is that
the ball that connects their rotor head to the axle slides easily up and down.
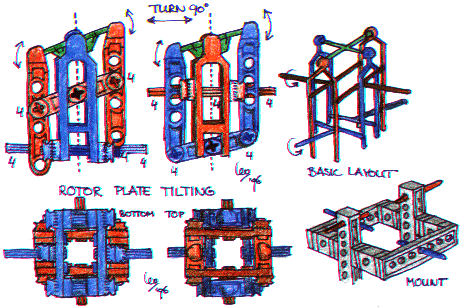
A plate tilting mechanism can be made using those weird suspension
braces from the Supercar. I used four, in two pairs (in the figure red and blue,
for clarity), cross-connected so that
the tilting action of 1 pair does not interfere with that of the other.
I was very happily surprised that this could be done; it gives a nice
implementation of 3 and 5 in the first figure.
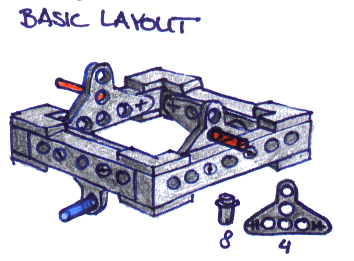
I later found a stronger way to make the
mount, compatible with the rest. It is as follows:
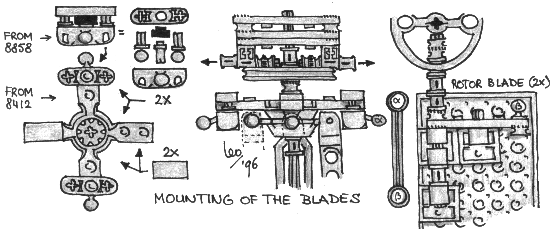
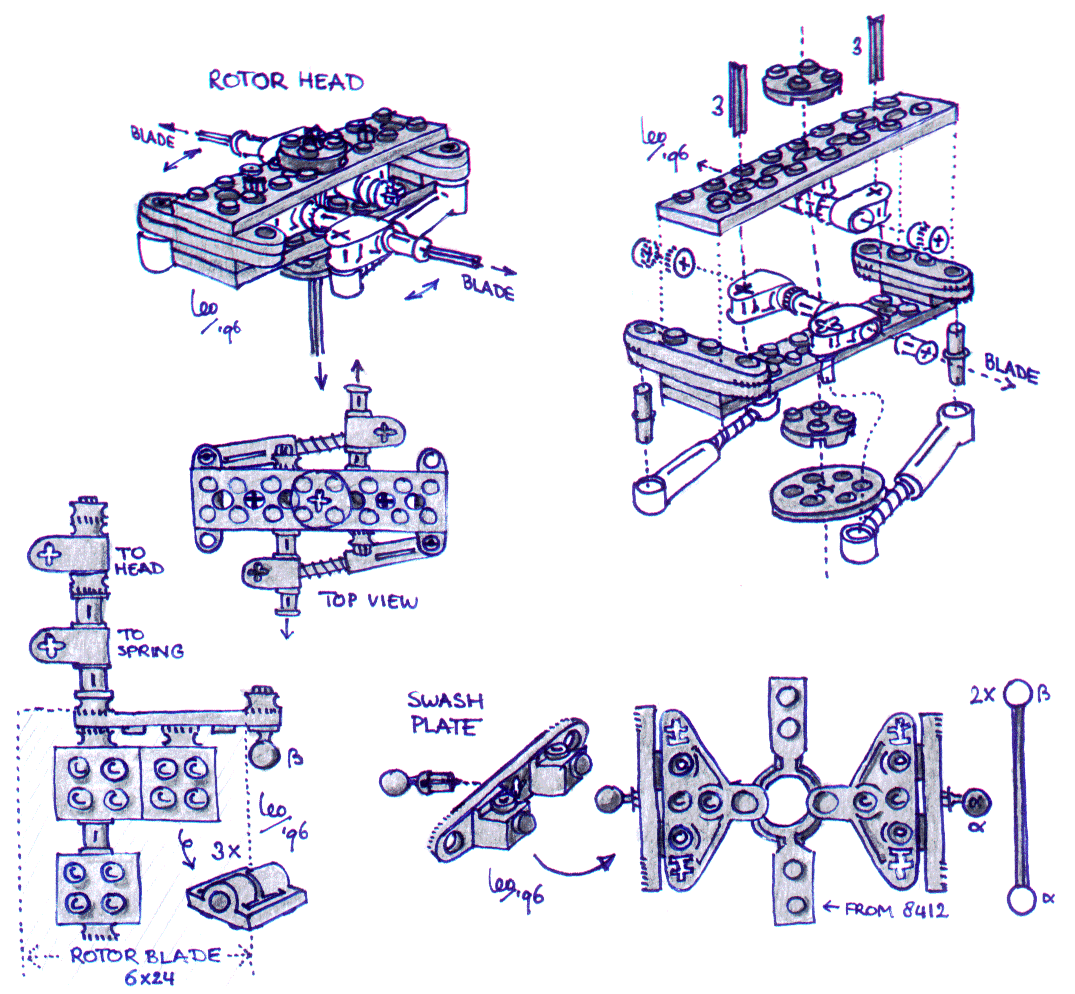
Then we need to make the rotor head. Here the tilting motion of the
plate needs to be transferred to the blades, using a swash plate.
So we need to use ball-sockets. I have two designs (I prefer the second):
-
I found a way to use the ball sockets from 8858 (Rebel Wrecker), in a rather
unconventional connection to the rotor plate, giving a nicely compact
construction. The connection of the blades to their axle needs to be done
with care, or they will fly off and hurt your cat. Two small washers did
the job for mine. As blades I used those very big plates, 6x24, from
the Monorail station (if I remember rightly).
-
In my alternative design, I have springloaded the blades so that
acceleration and deceleration is absorbed. Also, I have eliminated the
need for the special parts from the rebel wrecker. The rotorhead from
8412 is still used.
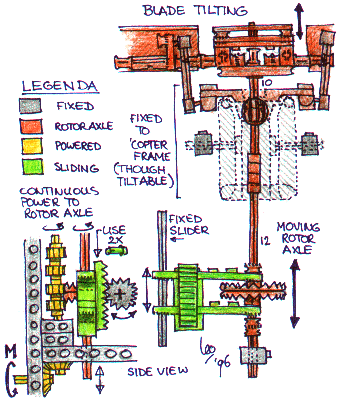
Now we need to be able to change the pitch of the blades as a whole.
In principle, you could make the tilting construction move up and down,
thus keeping the rotor axle always fixed relative to the helicopter body.
Whether this is what 1 in the first figure does is not clear, but I
believe that is the way it works in a real helicopter.
However, this gives problems in getting the controls to the cockpit, so I
made the whole rotor axle move up and down (in red in the
figure below), keeping the
tilting mechanism fixed (things fixed in the helicopter frame are grey).
The effect is the same. Transferring the power
from the frame to the shifting axle is done using a stack of gears
(orange); the sliding up and down must be done with little friction
(in green).
Those are the essential parts. How you want to lead those to the cockpit, and
which helicopter to build around this is left to you. Since you need to
buy a set that contains the rotor head anyway, LEGO's normal instructions
will tell you how to do that. But I find that the rotor by itself, without
the helicopter, is already a nice model demonstrating the power of
LEGO TECHNIC(r); and you can use it as a fully adjustable fan,
that can redirect the airflow without moving to and fro. Your cats
will be impressed!
The use of these in a real helicopter is indicated in the figure below,
from which you can learn some Dutch as well.
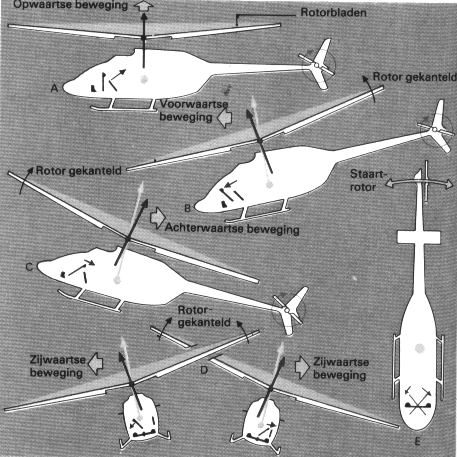
(Well, alright then: beweging = motion; opwaartse = upwards; voorwaartse =
forwards; achterwaartse = backwards; zijwaartse = sideways; gekanteld = tilted.
They suggest the rotor is tilted, but we know better: it is the lift vector
that tilts!)
email: leo@science.uva.nl


