3. LabExercise: Skin Color Detection
The learning set is collection of images. Each color image in the set
is of shape MxNx3 with an 8 bit RGB encoding. Please use the
scipy.ndimage.imread function so the image dtype is
uint8.
For each color image also a mask image is available of shape MxNx4. The added ‘color’ component is a transparancy mask and is set to 255 (fully transparant) for all pixels. The RGB color is (0,0,0) for non skin pixels, and (255,255,255) for all skin pixels.
The matplotlib imshow function knows how to deal with
transparancies in RGBa images. You can do two consecutive imshow‘s
and you get a nice overlay.
The set is organized in 4 directories:
- FacePhoto (face images)
- GroundT_FacePhoto (mask images, the file names are the same as in FacePhoto directory)
- FamilyPhoto
- GroundT_FamilyPhoto (mask images, the file names are the same as in FamilyPhoto directory)
A zip file containing these 4 directories is
SkinColor.zip.
The following code read an image and its corresponding mask and displays both of them:
In [1]: from scipy.ndimage import imread
In [2]: f = imread('python/data/SkinColor/FacePhoto/0520962400.jpg')
In [3]: m = imread('python/data/SkinColor/GroundT_FacePhoto/0520962400.png')
In [4]: plt.subplot(121)
Out[4]: <matplotlib.axes._subplots.AxesSubplot at 0x7f1008b58e80>
In [5]: plt.imshow(f)
������������������������������������������������������������������Out[5]: <matplotlib.image.AxesImage at 0x7f1008aa6390>
In [6]: plt.subplot(122)
�������������������������������������������������������������������������������������������������������������������������Out[6]: <matplotlib.axes._subplots.AxesSubplot at 0x7f1008ab5160>
In [7]: plt.imshow(m)
�������������������������������������������������������������������������������������������������������������������������������������������������������������������������������������������Out[7]: <matplotlib.image.AxesImage at 0x7f10089da748>
In [8]: plt.show()
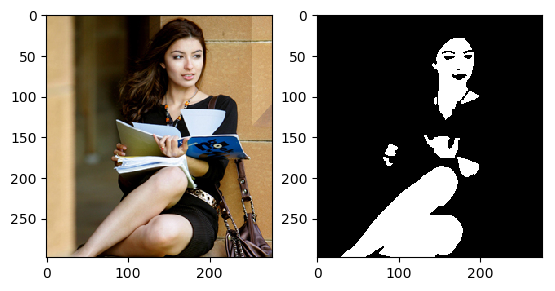
With the following code you can select all skin colors in a Ns x 3 array and all non skin color in a Nns x 3 array.
In [9]: skincolors = f[m[:,:,0]==255]

In [10]: print(skincolors.shape)
(13636, 3)

In [11]: nonskincolors = f[m[:,:,0]==0]

In [12]: print(nonskincolors.shape)
(68910, 3)
Exercise
Make a 3D scatter plot (using plt.scatter) of skin colors and
non skin colors. Randomly select say 500 colors from each class to
speed things up. Be sure to label the axes of the plot and to pick
different colors for the skin and non skin colors (no need to color
each individual color with its RGB value).
To make a skin color classifier we will use the skin and non skin colors to a logistic regression classifier (from sklearn). First we combine skin and non skin colors into one set.
In [13]: color = np.vstack((skincolors, nonskincolors))

In [14]: target = np.concatenate((np.ones(len(skincolors)),np.zeros(len(nonskincolors))))
Then we learn a logistic regression classifier on the first half of the colors
In [15]: from sklearn.linear_model import LogisticRegressionCV

In [16]: learn_color = color[1::2]

In [17]: test_color = color[0::2]

In [18]: learn_target = target[1::2]

In [19]: test_target = target[0::2]

In [20]: logregr = LogisticRegressionCV()

In [21]: logregr.fit(learn_color, learn_target)
Out[21]:
LogisticRegressionCV(Cs=10, class_weight=None, cv=None, dual=False,
           fit_intercept=True, intercept_scaling=1.0, max_iter=100,
           multi_class='ovr', n_jobs=1, penalty='l2', random_state=None,
           refit=True, scoring=None, solver='lbfgs', tol=0.0001, verbose=0)
And then test it:
In [22]: logregr.score(test_color, test_target)
Out[22]: 0.91074067792503577
Let’s see how it works on the entire image (yeah i know that is cheating)
In [23]: image_colors = f.reshape((-1,3))

In [24]: predict_skin = logregr.predict(image_colors).reshape(f.shape[:2])

In [25]: plt.subplot(121);

In [26]: plt.imshow(f);

In [27]: plt.subplot(122);

In [28]: plt.imshow(predict_skin);

In [29]: plt.show();
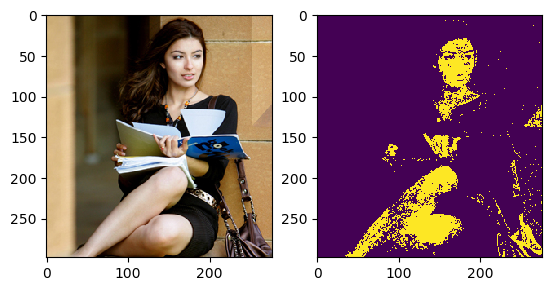
Not too bad for a first try.
Exercise
Skin color classification in principle can be done in a color space
with only two dimensions as it largely independent on the
intensity. One of the possible color models that makes an explicit
distinction between color and intensity is the Lab color
model. Install skimage to use the function
skimage.color.rgb2lab. Then use only the ‘a’ and ‘b’ components
of the color.
- Make a 2D scatter plot of skin and non skin colors in the ‘ab’ plane. Again use different colors for skin and non skin colors.
- Learn a logistic regression classifier using just the ‘a’ and ‘b’ color components.
Bonus Exercise I
We have done experiments using just one image. Can you extend this to use all images in the SkinColor dataset? It would be wise to randomly select only subsets of all pixels in the images to reduce memory and time...
Bonus Exercise II
We only tried logistic regression. Compare it with other classifiers.
Bonus Exercise III
Extend the classifier not to work on one color only. As a feature vector to the classifier take all colors in a 5x5 neighborhood (the feature vector then grows from 3x1 to 75x1). Probably someone has done this before but i can’t remember having seen the results (in this case i would use RGB and not just the ab colors), i guess it will take care of some of the ‘holes’ in the per pixel classification.